

Dancer of the Boreal Valley |
||
|---|---|---|
 |
||
| General Info | ||
 |
Location | |
| 5111 | 60,000 | High Wall of Lothric |
| Drops | Soul of the Dancer | |
| Defenses | ||
| Weak | Resistant | Immune |
|
|
n/a |
Pontiff Knight Curved Sword |
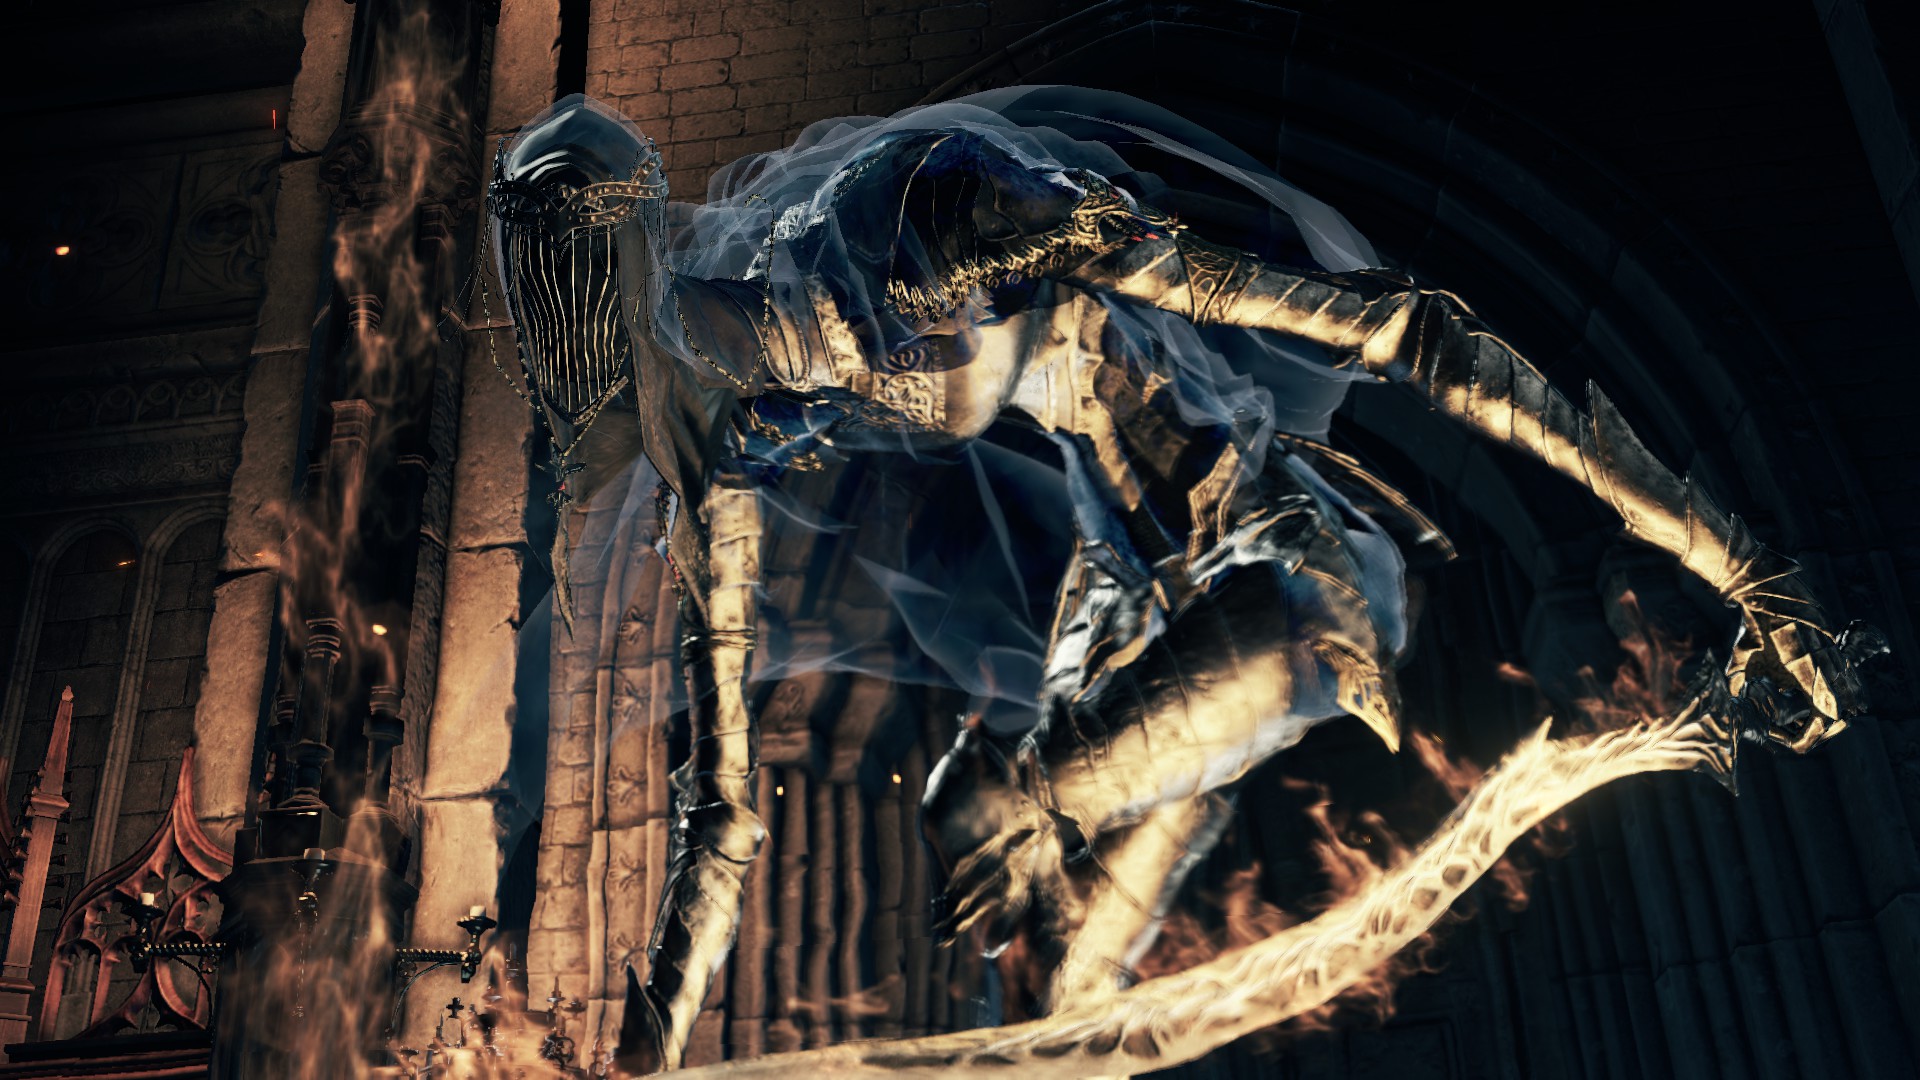
Dancer of the Boreal Valley Information
Dancer of the Boreal Valley is a Boss in Dark Souls 3.
- Not optional: Must be killed for entry to Lothric Castle.
- You can summon Sword Master NPC to help you fight this enemy. (Must have defeated Sword Master at Firelink Shrine, and not have defeated Vordt of the Boreal Valley). Summon can be found directly in front of Vordt's boss room.
- Lion Knight Albert NPC will use a Black Separation Crystal if Emma is killed to trigger the Dancer fight early, and will not be summonable afterward for Vordt.
Location
- Cathedral in High Wall of Lothric. Fight can be triggered by the player killing three Lords and being teleported there, or killing Emma.
Drops
- Souls: NG (60,000), NG+ (180,000), NG++ (200,000), NG+3 (202,500), NG+4 (216,000), NG+6 (220,500), NG+7 (271,350)
- Co-Op Souls: NG (15,000). NG+ (49,500)
- Other: Soul of the Dancer
Combat Information
- Health: NG (5111), NG+ (6625), NG++ (7287), NG+3 (7618), NG+4 (7950), NG+5 (8612), NG+6 (8943), NG+7 (9275)
- Deals Slash Damage, Thrust Damage, Fire Damage and Dark Damage (2nd phase).
- Weak to Dark Damage, Strike Damage and Lightning Damage.
- Immune to Frost, Poison/Toxic and Pontiff Knight Curved Sword.
- Dancer can be poise-broken, which breaks all of her attacks. However, if the player manages to stagger her by hitting her head, they can perform a critical strike.
- In her first phase, she holds a sword in her left hand. She enters her second phase at half health. Afterwards, she dual wields blades, and loses her grab attack.
Strategies
Video Strategies
Only Youtube Partners can place videos. Embeds from FL channel only - please add your link below if you're a partner
- Bleed Strategy, SL 64, Curved Sword, Kukris and Gnaw Miracles (no healing)
- SL 40 Pyromancer, using Black Fire Orb only. Semi-cheesy strategy that works for low level casters.
- Co-op strategy (+5 Irithyll Sword, Gold set armour)
- Deprived Dancer (Normal tactics)
Strategy 1 (Melee)
Due to the large size of her flame sword it is not recommended to dodge backwards when she does combos. Wield your weapon two-handed and watch her sword. You can roll towards her when she does a wide range sword slash. Her long arms make it relatively easy to roll under and past her and get a few hits on her backside. Attacking her beside her right leg is generally safer than beside her left one, since she wields her sword in her left hand. Do not be greedy with your attacks; you are unlikely to get more than two in before she counterattacks. Move away once the second part begins.
In the second phase things become more complicated. Do not attempt to block the entirety of her spin attack as she will certainly stagger you; abuse pillars and try to dodge some of it. You must play more reactively in this phase, as safely approaching her during combos has become more difficult and remaining close to her is out of the question. Wait for her to perform an attack with a long ending animation, then hit her and move away again (being very wary of the delayed action on some of her magic effects). You have time to strike her once during the jump & spin combo, between the landing AoE and the circular slash (dodge backwards at least once after the attack). Continue patiently getting hits in and avoid endangering yourself and you will win before long. You may also use projectile consumables to damage her more safely, although in phase 2 if you distance yourself from her she will jump and reposition herself, which will also involve an attack.
In addition to the above, since the Dancer is one of the more difficult bosses (speedrunners of the game even rate her about a 9 out of 10), below is a full playbook on how to beat the Dancer of the Boreal Valley as a melee class. It contains twelve essential tidbits of knowledge that are formulated from watching no-hit SL1 runs of the boss.
- The Dancer opens up the fight somewhat calm, but becomes more aggressive as her health goes down. Being a harder boss, the player only gets up to about three hits before he risks getting hit, and the Dancer does about 600HP damage pretty easy on a ~SL81 character, so it is not advised to get greedy, especially considering that the Dancer's resistance is low, and she is pretty accepting of damage.
- The Dancer's attacks, like was just said, are very damaging. Luckily for the player, her telegraphs are there, and involve her raising her swords.
- Avoiding her attacks is not that bad. The player will not have as easy of a time as he did with Pontiff in avoiding them, but he will not be dealing with the same level of hectic activity as Aldrich, either. The Dancer is somewhat in-between those in how she keeps the temperature of the fight. Going to her rear, and clinging to her trunk avoids most swings, so any attacks that cannot be tracked for dodging can be tanked on the player's shield. She is not a fast turner, so keeping a lock and strafing to hug her rear is not difficult.
- At this time, it is very easy to have 13 Estus Flasks at +8 strength, so this is desirable and gives a lot of extra HP to draw from in the battle, even if the player's vigor stat is low.
- The Dancer's attacks are very fast, even if her telegraphs are very noticeable. Her most dangerous attacks are spinning attacks, like with some enemies in Irithyll Valley, and those can insta-kill the player, so the player should mind those. Her telegraphs have a tendency to appear as fake-outs, so the player should note that it is only a good idea to dodge if she is actually throwing an attack with her blades, and to note that little things like head jerking do not mean anything.
- Of those spinning attacks mentioned above, she has an attack that cycles seven times (The Blade Dance, like it says below), where on the seventh time, she may spin twice. It is possible, while hugging the back of her pelvis (being closer to the back of her right thigh may optimize this more) like mentioned above, to completely avoid getting hit by six of those attacks, and then waiting for the seventh to roll in the direction that the blade is swinging to avoid damage while optimizing invincibility frames. This attack tends to run counter-clockwise, so rolling to the left, or in the z-axis are doable for that finishing spin. Youtube videos are good at showing this!!
- There is a shorter variant of the Blade Dance move that is about five spins long, where the Dancer's rear flank will not be safe for the last two spins. This is dodgeable if the player remembers that his invincibility frames start when the dodging animation starts.
- If the player is finding it hard to get to the flank of the Dancer at her back, it helps to strafe to the player's left, over the Dancer's right shoulder, where she has an empty hand. Her leg is further forward there, so it will not block the player from strafing to get to her back.
- The Dancer has a grab attack that comes out of her empty hand. This can do about 1000HP of damage, so the player should avoid this.
- The Dancer does not consume a lot of stamina, if a player is trying to block attacks, but she will still stagger if the player actually relies on his shield, so unless the player has one of the best shields, a lot of HP, and a lot of defense, he should avoid this tactic entirely.
- The dancer has an AOE attack, where she attacks the floor, and screams. This has about a six foot radius. No need to get hit by this!
- When she loses about 35% of her health, she will attack the floor and do her AOE, but this will have a good twelve food radius, much bigger than her other AOE. She will then fill her empty hand with another sword, then do her blade dance move, where she spams her spinning attack, so the player should note that will come at that time.
That is basically the top and bottom of the fight. The player now knows the dangers, how to avoid them while preserving the means to attack, and being efficient, so the fight will be much easier with that playbook.
Strategy 2 (Pillar Peek)
This strategy can be done with either sorcery or melee. When you go into the room, immediately go to one of the four pillars. Make sure to roll/smash the surrounding furniture to allow for free movement. Now you'll just need to keep kiting the Dancer around the pillar, or just keep moving left and right slightly to keep the Dancer in one place so that she can never progress towards you and is stuck at the pillar. Be careful though, she can still hit you through the pillar. If you're keeping her in place by taking advantage of how she tracks and aggroes, she won't be able to move towards you during those attacks so just keep a distance when she's attacking. This is useful because during attacks like the Blade Dance, she will just spin in place and not pose a threat at all.
Just wait behind the pillar while she attacks and during her recovery phase get a quick hit in, and retreat back to kiting. Be cautious, especially during the second phase, of what opportunities you use to attack. You'll want to have enough time to run to her, attack, and move back. Throw a Pestilent Mercury into the mix and the fight becomes somewhat trivial.
Strategy 3 (Magic)
The Dancer of the Boreal Valley is one of these bosses which are more difficult for spellcasters simply because she is able to quickly close the distance. For example, she will end her spin attack in phase 2 after just a few spins once she has reached melee distance with you.
All sorcery spells work well against the dancer, although it is easier to avoid getting hit when relying on faster spells such as Great Soul Arrow or Soul Spear. The Dancer is also weak to dark magic - so one easy solution for this boss fight is to use Affinity: Make room between you and the Dancer (especially the wooden area on the left and right of the church, behind the pillars, are great), cast Affinity, stay in range, lock on, cast Soul Spear on the Dancer, run away and repeat. Other good spells here will be Black Fire Orb, but ordinary fire spells such as Chaos Bed Remnants or Great Chaos Fire Orb will also do big damage.
Strategy 4 (Dragon Crest Shield)
This strategy works great for Thieves. Hiding behind the Dragon Crest Shield gives you the opportunity to stay close to her most of the time. The key is to stick behind her as much as possible and to wear her down with a quick one-handed weapon. Painting Guardian's Curved Sword is a great choice. Watch your stamina bar and lower your shield when possible to recover it quickly. Chloranthy Ring is a great addition. During some of her combos it might be necessary to back off completely to recover your stamina. Just make sure your stamina never depletes when you are close. Since the pace of the fight increases during phase 2 you have to pay more attention to her moves but basically you can stick to the same strategy.
Attacks
| First Phase (the Dancer wields a flame sword) | |
|---|---|
| Attack Name | Attack Description |
| Residual flames | Many of the Dancer's attacks with her flame sword leave scorching marks that deal damage if the player walks over them. |
| Triple hit & slam | The Dancer rapidly slashes her sword thrice, then slams in a slower attack. |
| Grab | The Dancer attempts to grab the player, impaling them with her sword if she succeeds. The hitbox of the grab is cone-shaped, narrowing as it gets nearer to her. Deals enormous damage. |
| Swing | The Dancer swings her sword in a diagonal motion. |
| Slam | The Dancer slowly slams her sword into the ground, has tracking. |
| Twirl | The Dancer stands up, before quickly swinging her sword in a short ranged 360 degree arc around her. |
| Thrust | The Dancer draws her sword back, then thrusts it forward in a straight line. |
| Fire thrust | The Dancer draws her sword back, then thrusts it forward in a straight line, shooting a jet of flame from its point. |
| AoE explosion | The Dancer raises a flame to her lips, then blows it to the floor, creating a medium sized area of effect blast around her. |
| Second Phase (the Dancer wields an ash sword along with her flame sword) | |
| Attack Name | Attack Description |
| AoE ash cloud | The Dancer reaches into the ground to draw her second sword, creating a cloud of ash that does minor damage. The second phase will always begin with this attack. |
| Blade dance | The Dancer follows swings her swords in a series of vertical arcs, before finishing with a medium ranged horizontal spin attack. She will follow the player during this attack. |
| Slash, spin & double thrust combo | The Dancer performs two slashes in front of herself, followed by a short ranged spin attack, two more slashes, and then a forward thrust using both of her swords. |
| Slash combo | The Dancer performs a wide arcing horizontal slash, then follows up with a similar vertical slash. |
| Jump & spin combo | The Dancer readies herself, then jumps to the player's location. Upon landing, she creates a short ranged area of effect explosion, then follows up with a short ranged spin attack after a small delay. She will use this attack to close distances. |
| Dual uppercut | The Dancer swings both of her swords in an ascending arc in front of her, knocking the player into the air if hit. |
| Erupting ground slices | The Dancer drags her flame sword through the ground in a counterclockwise 180 degree arc, then does a similar clockwise cut with her ash sword. Shortly after each cut is made, it erupts with the element of the sword that created it, knocking the player into the air if hit. |
| Ash AoE | The Dancer thrusts her ash sword into the ground halfway to its hilt while releasing an ash cloud in a circle around her, then after a small delay thrusts it in further, creating another ash cloud. Both ash clouds inflict considerable damage, and it is possible to be damaged by both in consecution. |
Lore Theories
- She was one of the daughters of the royal family of Irithyll, but was ordered by Pontiff Sulyvahn to become a dancer first, and then legioneer, which is equal to exile. He also gifted her dual blades, infused with darkness and fire, similar to his own weapons.
- While Pontiff Sulyvahn wields his dark weapon in his left hand and his fire weapon in his right hand the Dancer does the opposite, wielding dark in her right hand and fire in her left hand.
- All Outrider Knights are fated to turn into beasts. According to her armor's description the armor is actually fused to her "hide".
Notes & Trivia
- The most dangerous part of the first phase is her grab attack. She announces the attack with a snake-like bow and then slowly sweeps her right arm over the floor to grab you and smash you on the floor. Either get some distance immediately when you see her bow or roll-dodge through the sweep (she uses her right hand, so roll to the left or you will get caught in the sweep).
- If you dodge one hit of a combo, the remainder of the combo is unlikely to strike you.
- The setting of this battle is reminiscent to that of Bloodborne's Vicar Amelia, which is fought in the Healing Church's Grand Cathedral.
- Uses matching swords; one gold, one dark, similar to the Gold Tracer and Dark Silver Tracer wielded by Lord's Blade Ciaran in Dark Souls 1, and wields them in the same hands. Also conceals her face, like Ciaran. These things seem to suggest a relationship between the two, and possibly that there are other characters corresponding to the Knights of Gwyn.
- During the fight, you can clearly hear each of her footsteps echo throughout the room.
- Attacks with the fire sword will leave traces on the environment and will light objects in the room on fire (just visual).
- By the end of the fight, it's likely that half of the room is on fire and lit brightly.
- Once defeated, the Dancer explodes into ash and extinguishes all of the fire in the room.
- In beta footage, the Dancer is called Dancer of the Frigid Valley.
is she a just dance player ?
4
+10
-1